Part 2 of our beginner’s guide to exercises for arthritis relief is here!
As we discussed in Part 1, arthritis can often flare up in the winter, but it doesn’t mean you can’t reap the benefits of a safe fitness routine. If you have arthritis, strengthening your muscles is one of the best things you can do. It reduces strain on your joints, which can help relieve pain, improve coordination and range of motion, and slow further deterioration of joints.
That’s why we selected various quick exercises that accommodate beginners and people with arthritis. These exercises are great for the body in general and can help with many different types of arthritis (remember: everything in our body is connected). Like last time, we will go over the steps to each exercise and add some modifications to make the movements easier (and still effective!) We’ll also provide you with diagrams showing the direction of movement, and highlight exactly you should feel each exercise.
You’re likely eager to start exploring more exercises. But first, let’s go over a brief reminder as to why your core is so important and how to ease yourself into trying these new routines:
Core Exercises For Beginners: Top Tips
There is a myth that our core means our “centre” and exercising your core means doing some abdominal crunches. This is not true! It is much more than that. Your core connects everything. It stabilizes our pelvis, spine, and connects our upper body to our lower body. It also helps with weight-bearing, which in turn impacts the feet: if you have a strong core, it means your feet don’t need to work overtime to support your weight. This helps with numerous foot conditions and mobility issues resulting from osteoarthritis, rheumatoid arthritis, psoriatic arthritis and gout! To learn more about why, check out Part 1 of our Beginner’s Guide to Arthritis Exercises to learn more about why core exercises are beneficial and how they can improve functionality in our entire bodies.
When performing core exercises, beginners must pay attention to how their bodies respond. That leads us to our top beginner exercise tips to keep in mind when you exercise:
- Take note of the muscles you’re supposed to be targeting and focus on them when you’re doing the exercise. If you don’t “feel the burn” per se in those areas, you may need to adjust your form until you do. Form includes correct posture and body positioning and ensuring you’re working the target muscles. Good form ensures you’re working your muscles properly, which will help treat arthritic pain. Neglecting proper form can negate these benefits and increase your risk of injury. To help you out, we highlighted the primary target area where you’ll feel each exercise the most (although you may also feel it in others too), and the direction you should be moving your body.
- You only need to extend far enough to feel the exercise in the targeted area; you don’t need to move any further than that. Don’t worry if you don’t perfectly match the diagrams. Remember: those are just for demonstration purposes. Everyone’s body is different, so it’s perfectly natural if you don’t look exactly like the diagram when you do the exercise. The most important thing is that you feel your targeted muscles working and are comfortable.
- Ease into your exercises: Similar to the last point, it’s important not to overexert yourself as a beginner (or at any level). Start slow and easy, and then gradually work your way up. There is a difference between feeling like your exercises are working and feeling like you’re going beyond what you can handle. For instance, some slight pain following training is perfectly normal. This means your body is getting used to your awesome new strengthening exercises! What’s not so normal is overextending yourself, trying exercises where the positioning feels risky and feeling sharp or stabbing pain. If this occurs, you can reduce how far you’re extending, do fewer reps during a set, or try position modifications. If that fails, try a different exercise that targets the same muscle group.
Whatever you do, the most important thing is that don’t give up! Just keep trying: You’ll find a way to work it out, and learn more about your body in the process.
Now, let’s get into some great exercises for arthritis:
Calf Raise
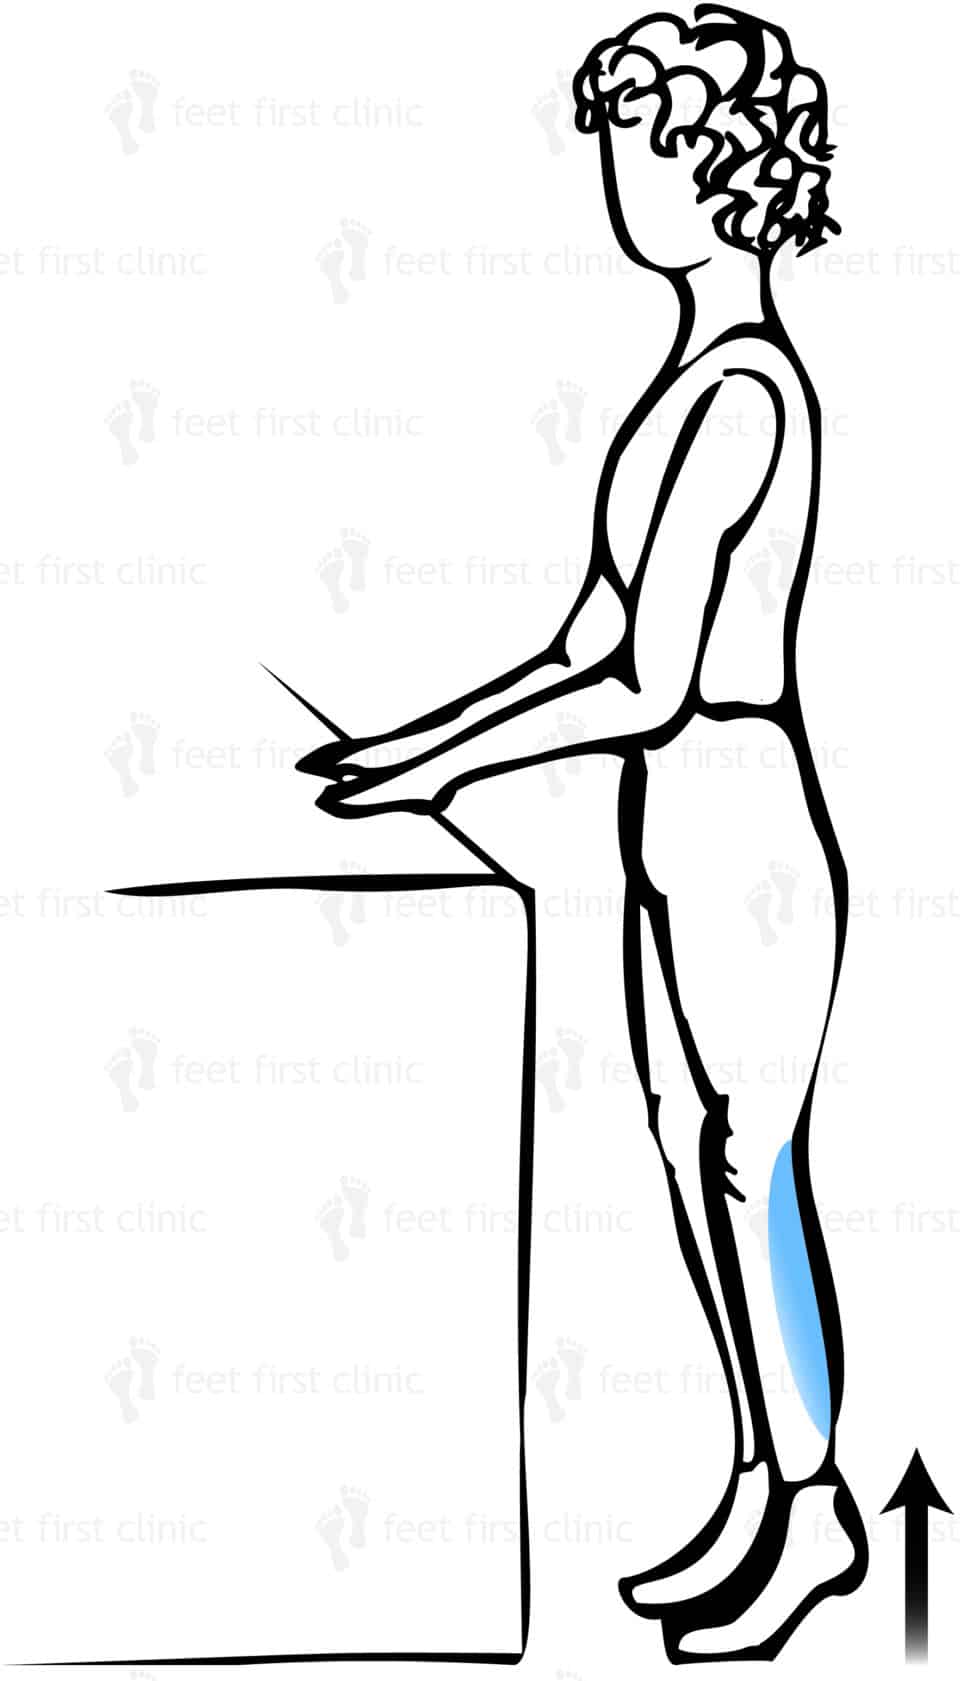
Calf muscles should be a focus for anyone who has trouble walking without pain, and calf raises are a great way to strengthen them. This exercise flexes and stretches the muscle while also benefitting your hamstring and the back of the knee. As your calf muscles become stronger, they reduce ankle strain and become more capable of supporting your knees. What’s more, regular calf raises can improve overall ankle stability, balance and strengthen the muscles surrounding the knee joints. Calf raises are also great for working the plantar muscles in our feet and treating plantar fasciitis.
How To Do The Calf Raise
- Stand up straight while placing your hands on a countertop, the back of a chair, or wall for balance support.
- Plant your feet firmly on the floor
- Raise your heels and calves slowly upwards as you shift your weight toward the ball of your foot
- Hold until you feel your calves working, and then slowly set your heels back down.
- Repeat ten times if comfortable.
Modifications: If you don’t feel this in your calves at first, try shifting your weight forward or backward until you do. If you still don’t feel your calves working, you can increase the intensity by doing a one-leg calf raise instead, which you can view our stretching Pinterest board. You can also try holding light weights (or cans) as you do the exercise.
Where You’ll Feel It: The calf raise exercise stimulates the muscles that run down the back of your lower leg. You may also feel it in your feet as you raise and lower them.
Bird Dog
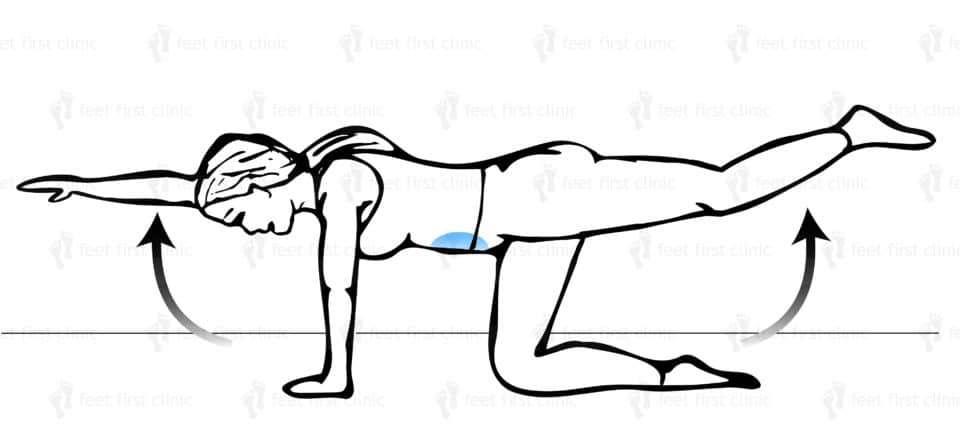
The bird dog is a great core exercise for arthritis treatment. Its primary function is to address lower back and hip pain. BarBend also states that it’s good for overall spinal stability. The extension involved in this exercise boosts your core’s overall function and can also help improve everyday coordination. People with arthritis often struggle with coordination due to pain, and honing in on improving it can prevent falls and other injuries. This exercise also targets your deep core muscles, which is why physiotherapists and chiropodists recommend it.
How To Do The Bird Dog
- Start by getting on your hands and knees. Your hands should align with your shoulders and your knees with your hips.
- Extend and raise your arm and the opposite leg outward. Your body should feel like a straight line.
- Switch arms and legs and repeat. Try to do it ten times on each side.
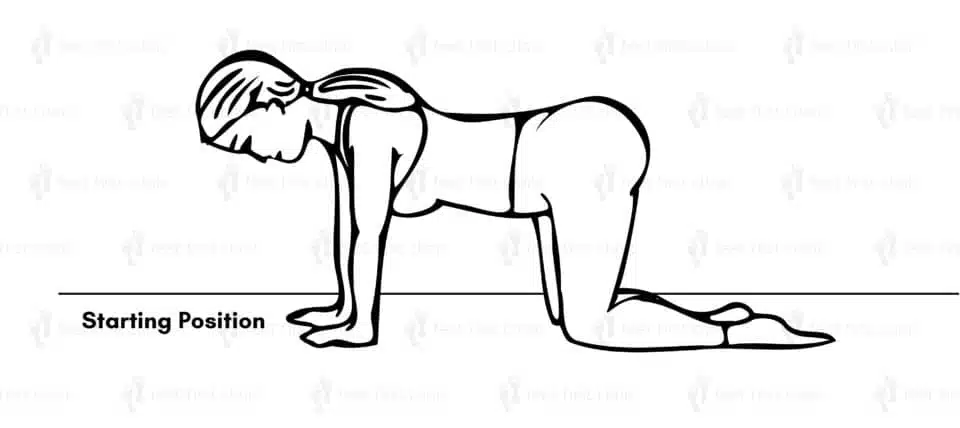
Tip: Try to keep your back and body from leaning to the side as you do this (you can look down at your chest as a reference). If you have difficulty feeling the exercise, check to make sure your back is straight in all directions, and make sure the back isn’t arched. You can also try tightening your abdominal muscles as you do the exercise.
Modifications: If you have knee pain or are intimidated by this exercise, you can work your way up by starting on your stomach instead of your hands and knees (this version is called the alternating superman exercise). You would then raise your opposite arm and leg slightly off the floor while keeping your belly planted. You’ll still gain the same benefit as bird dog, but it’s much easier and puts less strain on your knees.
Where You’ll Feel It: You will mostly feel this exercise in your abdominal muscles, towards the sides. It also works the glutes and erector spinae (muscles that extend vertically up the length of your back). You may slightly feel it in your lower back and shoulders too.
Toe Spread-Outs
Toe spread-outs are an excellent exercise for beginners because you can do them while sitting, and the movements are simple. For people with arthritis in the feet, they help keep muscles active and prevent atrophy from lack of use. This can occur when arthritis-related joint pain limits movement. Working the toes can also help with ankle stability and knee and hip pain. Toe spread-outs are also an effective way to treat bunions. Over time, they help to soothe the pain caused by excess bone and tissue at the base of the big toe.
How To Do Toe Spread-Outs
- Sit down with your back straight and feet planted firmly on the floor.
- Lift your toes up (while leaving the rest of your foot on the floor) and spread your toes as far apart as you can.
- Hold this position for 5 seconds.
- Relax and repeat ten times, adjusting according to comfort and capability.
Note: Don’t worry if your toes don’t spread apart. Just doing the motion and trying will still be beneficial.
Tip: When you get used to this exercise, you might want to make it a little more challenging. To do so, try wrapping a rubber band around your toes for more resistance.
Where You’ll Feel It: Creaky Joints notes that toe movements help work the group of muscles in the foot called the intrinsic muscles, a crucial area to focus on for anyone experiencing arthritis-related foot pain.
Clamshells
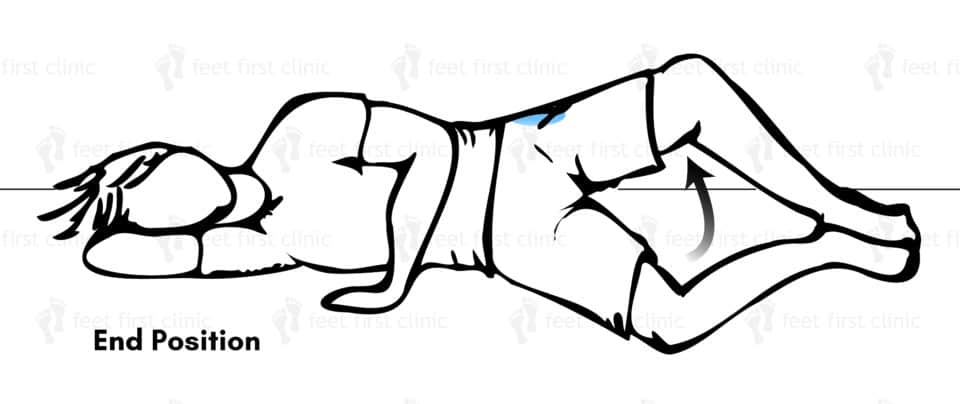
Many arthritis patients complain about pain in their “hips” (or the side of the buttock/pelvic region). A good way to target hip pain is by working your gluteus medius (main abductor and external rotator of the hip), gluteus maximus (extends the hip), and gluteus minimus muscles (hip stabilizer and rotator). The clamshell is a perfect choice for low back and hip pain management, and easing yourself into this exercise can also produce results like better mobility and stability. You can also do this exercise in bed or on the couch! As long as your form is correct, there’s no harm in doing your clamshells in a cozy environment.
How To Do Clamshells
- Lie down on your side and keep your heels together with slightly bent legs. Try to keep your feet in line with your back
- Lift the top leg a few inches while keeping your heels in contact. The movement will look like a shell opening, hence the name.
- Don’t hold the position. Keep going upward and downward slowly, for ten times if possible. Then you can switch legs.
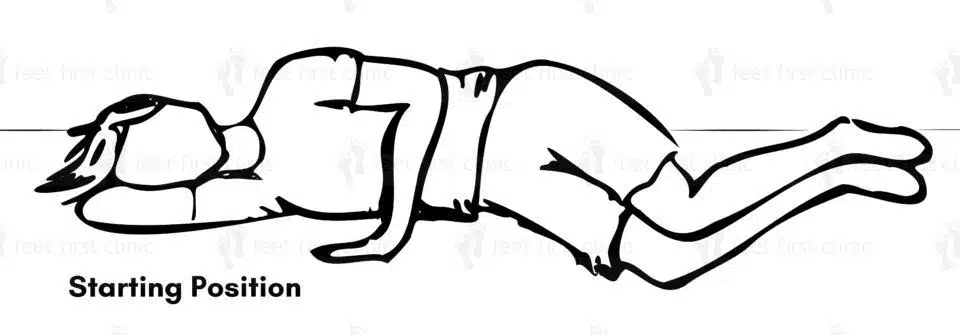
Where You’ll Feel It: You’ll feel the effects in your gluteal muscles located near the side of the butt (we often refer to this area as our “hips”, but it’s actually part of our buttocks – our “hip” is closer to the groin area. That said, the two are intrinsically linked so it’s very common to use the two interchangeably).
Tip: Make sure your body is straight and that you’re not in a fetal position. Ideally, your back should be aligned with your feet. If you’re not feeling the muscles in your butt region working, try shifting or rolling your body forward or backward.
Modifications: The side-leg raise may be more comfortable for some people. You’re still lying on your side like the clamshell exercise, but you don’t keep your feet together or bend your legs. Instead, you keep your top leg straight and raise it, alternating between legs by switching sides. Both exercises benefit the same muscles, so just it’s a matter of what works best for you and which one you can do more regularly.

